Tuesday, September 4, 2012

Rosette and Neck

Here are pictures of the rosette and neck.

With the rosette, I had to carve out a trench that was 1 cm deep, to get the abalone flush with the top of the board. I carved out the trench by hand, and it took a whooping 6 hours to get all the material to fit nice and snug (the tape is to keep it from popping out until I sand it down).

I also carved the neck into shape, (I know it's hard to see in the pictures). But, I have it just the way I want it.


Thursday, July 26, 2012

The Neck and Sound Hole

Today I cut out the neck and the head stock. For the head stock I cut out the design on a piece of paper first, then I traced it out the wood, I think it looks pretty good. It still needs some work to get the way I'd like it.
I also started the sound hole and I did it backwards, I was supposed to cut out the rosette first, so now I have to find out a way to get a perfect circle to cut the rosette out (thinking...........). I'll tell you how I did it, when...... I figure out how to do it.


Tuesday, July 24, 2012

Sound Boards and the Neck

Ok... So after a long couple weeks of being very busy, I finely did some work on my guitar.
I sanded and cut out the sound boards for the top and back and I cut out the neck, to tell you the truth, I'm very pleased with how it all has turned out so far.
For the next part, I'm going to cut out the sound hole and put in the rosette around the sound hole, and glue on the bracing on the sound boards.
Hopefully that won't take a couple weeks (Hehe).
Bye for now.


Tuesday, June 26, 2012

Back Board

I finely have the back board glued together.
The next step is, to put the dimensions on the glued pieces and get it all cut out.
I hope to post again soon.


The Answer

Sorry to say, but you all guessed wrong.
The answer is... Wait for it (long pause).
It's the Rubber Band! If you look at the top of the picture there is a small rubber band right above the board. So none of you win the prize (Haha! There was no prize).


Saturday, June 16, 2012

WHAT HAPPENED!!!

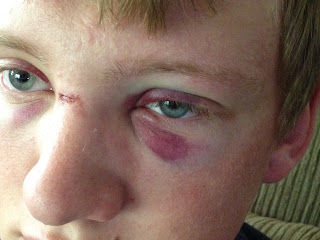
So Thursday night we were at my little brother's (Cooper) baseball game, and my older brother (Shane) and I were going to do ground balls on another field. So Shane was hitting the balls to me, and the last one he hit, it hit something on the ground and it jumped up at me and hit me on the nose right between the eyes. So now I have two black eyes and a cut on my nose. In the bottom picture it's hard to see the other eye.
Lots of fun on the baseball field right! Not!! It hurt really bad, I'm telling you all so you don't copy me.

In the top picture I'm using two ice packs to help with the swelling, and my youngest sister (Ember), said I look like an alien with two big blue eyes.


Two Glued Pieces and One Gluing

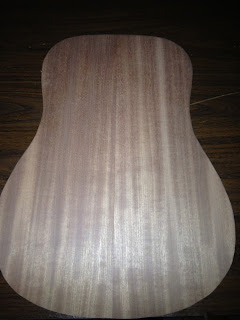
So here is the top soundboard and the neck.
The last picture is the back soundboard being glued together.


Saturday, June 9, 2012

Background

 Can't you tell I don't like the built in backgrounds on here.

I've Begun Building

Today I've started the process of building my first guitar, at first it was going slow, because I broke the handle on the gate for the band saw, (which was by accident).

Here is the beginning of the neck. remember the piece of mahogany I had, I cut it in half with the band saw, and is what I started with, it's about 43" inches long. Then I cut off smaller blocks to build up the ends (for the head stock and the heel). Then I glued it all together, as you can see I went a little heavy on the glue. I know it's hard to see what I did with all the clamps in the way (a better picture coming soon), I would have taken a picture before I clamped it all together, but I had to do it before the glue started to set (it's fast drying glue). I'm letting it sit over night and we'll see what it looks like tomorrow, I mean today, I don't know what I mean, it's been a long day.  ; P


There is the sound board, does it look nice? It already has the pattern on it. Yes! (with a fist pump).

What I had to do is, I had to joint it the edge that is going to be glued. So I ran both boards though the jointer a few times to make a nice straight and square edge on both boards, so I held the boards together to see if they had a nice joint (no picture, because the of lack a third hand). Then I made the clamping system (if you want to call it that), it's a row of nails on both sides, nailed to a board a bit smaller then the two sound board together. As you can see I laid a board on top then another to clamp it, to make sure it would't get stuck, I laid two plastic bags on both sides so it wouldn't stick to the other boards. That as well is sitting over night


More to come soon!

Saturday, May 26, 2012

The Last Two Pieces

I decided to buy a bridge for my first guitar, and here it is. The bridge is made of indian rosewood and the saddle is made of bone.


Wednesday, May 23, 2012

More Supplies

Here is the wood I'm going to using as the body.
The darker is Sapele, (it comes from Africa and is in the same family as Mahogany) and it's going to be the back and sides. The lighter wood is Engelmann Spruce, and it's going to be the top, and there is 2 of each board.


Here is a bone nut, on the Sapele.


I'm going to start build soon. :D

Tuesday, May 22, 2012

Some supplies

Here are some of my supplies.

This is almost everything.
Guess what is in the picture that doesn't belong? :)


The white dots are mother of pearl, and these are going to be marks on the neck, and the sizes are 6mm and 2mm. The green things are paua abalone, the 1x1 square is going to be my logo (to be shown later), and in the other bag, are sixteen curved pieces that are going to go around the sound hole. 
The strap buttons are the little chrome pieces, and the hard to see black things are Ebony bridge pins.


This is the binding for edge of the body of the guitar.
Colors: Cream, Black and White.

The little long thing above the wood is the fretwire,
and the wood is the bracing for the inside of the body.

Here is the truss rod (the red thing), and kerfing lining (made of basswood).
The lining goes on the inside along the corners of the body.
The U looking thing on top is perfing (made of thin dried maple, black and white)
It's to go around the sound as well. 

The tuning heads or machines (made in Germany).

This is going to be neck and fret board.
The black board is Gabon Ebony from Africa,
and the other board is Genuine Mahogany.


More to come.

Friday, May 18, 2012

First Post Ever!!!

Hello to all!!

This is my first post! on my first blog! :D I'm going to be posting pictures of the guitar(s) I'm going to be building, from start to finish. I almost have everything I need to begin building the guitar, when I do get the last package in the mail, I'll be posting a picture of all my materials I'll be using to build the guitar. Well bye for now! :)